Friday, July 8, 2011

An Ell of a Time

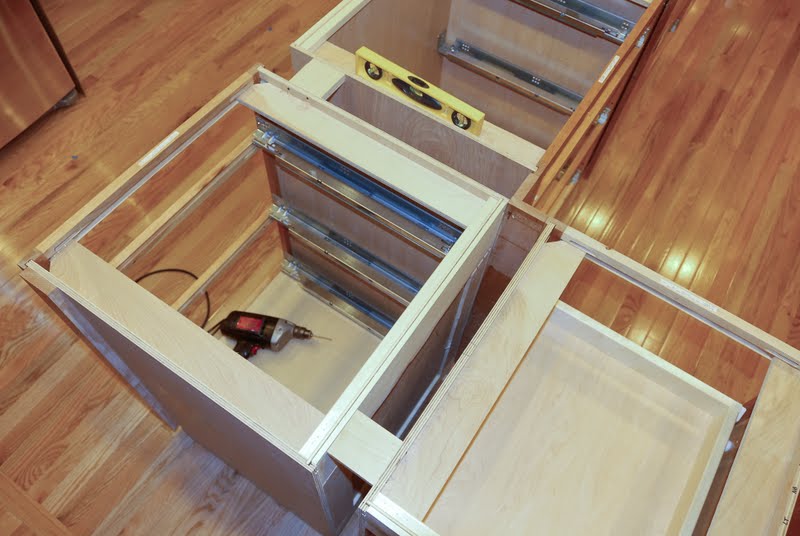
3" spacer clamped for drilling


Today was spent on the two end cabinets that give the island an "L" shape.  After Sharron and I discussed our approach to how we would fashion the inside corner, I spent a considerable amount of time getting the cabinets leveled.  Here's the first 3" spacer clamped and ready for drilling to form part of the inside corner.


The next step was to install the 2x4 block for the last cabinet and drill holes and run the power wire for the outlet on the side of the cabinet.


End cabinet wired and blocked before returning upright


Here's the finished inside corner.


The two end cabinets were then blocked to the rest of the lineup for a very solid structure.


Spacers installed on last two cabinets

Spacer block between cabinets to maintain proper alignment and to add stability


We will install the two back panels tomorrow to complete the island installation work required for the granite fabricator to take measurements on Monday.  The kick space trim work will be done later.

Thursday, July 7, 2011

Half an Island

This morning, I cut holes in the end cabinets for the AC outlets, then began shimming the first three cabinets to get them level and in line with each other.  The blue tape in this photo was used to mark the position of the first cabinet.

Marking shims


Here's the first cabinet on its back to facilitate the installation of a piece of 2x4 (with 3" lag screws) to enable me to later secure the cabinet with screws through the bottom of the back panel.  The wire for the outlet is shown here running through the floor (hated to drill into our pretty, new floor boards) and terminates in a junction box that I installed in the basement.  The second outlet wire will also run to this junction box and a feeder wire will be run to the breaker panel for power.


Outlet and cover plate installed and wired 


I aligned, clamped and screwed the front panels of the three cabinets to each other, then ran a string along the back of the cabinets to ensure proper alignment before installing some shims between the cabinets to preclude any movement.  The cabinets are locked to the floor and to each other and have a very solid feel to them.  I plan to finish the island tomorrow.

Alignment string and levels


Spacers between cabinets


Wednesday, July 6, 2011

Dishwasher Installation

I spent the entire day getting the dishwasher installed and leveled, along with a support structure to secure it to the cabinets.  It is now wired to the circuit breaker and lines for the water supply and drain are connected. Once we have a sink and disposal, I'll connect the other ends of the water lines under the sink, test for leaks and give the dishwasher a smoke test.  I also got the second spice rack installed next to the dishwasher to complete the main kitchen lineup, as seen below..


Amanda put Post-it Notes on the cabinets to designate what will go in them, and started transporting some items that we've been temporarily storing in the dining room cabinets.

Kitchen cabinets labeled with Post-it Notes

Unloading the dining room cabinets


 Since we won't have a wooden counter top to support the dishwasher, I made a frame to do the job.  This supports both the dishwasher and the spice rack

Dishwasher and spice rack with cross-bars tied into adjacent cabinet and wall stud
Support structure detail with angle brackets and screw into wall stud

Tomorrow I will work on the AC outlets and floor bracing for the island.  My goal is to complete the island on Friday.

Tuesday, July 5, 2011

Vanity

Amanda earning her plumber's merit badge
Yesterday, we removed the toilet and the old vanity in preparation for installing the flooring in the powder room.  We had previously removed the vanity to remove the old linoleum floor, then re-installed it for the convenience of having a functional sink. 


It was a bit worse for wear, having endured the rain while sitting on the deck, and was on the verge of collapsing when we carried it out to the deck.


With the toilet out of the way, Sharron and Amanda removed the staples that had held the linoleum underlayment in place.


We added an extender ring for the toilet base flange to compensate for the increased height of the new flooring.


Sharron cut out a hole in the felt paper for the toilet.  I did something similar for the floor boards, but with a jig saw!


Marking end board for cutting


It took most of the day to get this small area covered with flooring, mainly due to working around the toilet base, but also in maintaining a good pattern with the board ends.  


Today I shimmed and installed the new vanity, and Amanda and I re-installed the toilet.  With plumber's putty around the bottom rim and a wax seal on the drain hole of the toilet, we had to avoid setting the toilet in the wrong spot.  With more than a little difficulty, we finally got the thing lined up with the floor flange mounting bolts and tightened down.  We installed the tank, connected the water line and gave it a thorough check for leaks.  None found!


Tonight, I leveled and secured the base cabinet to the left of the stove, after contacting our granite fabricator to discuss how much space to leave between the stove and cabinet.  The answer is 1/8 inch - just enough to pull the oven out for cleaning/maintenance.

Tomorrow I will wire the dishwasher and secure the second spice rack to complete the base cabinet installation work in the sink area.  Then, it is on to the island.  The granite fabricator is scheduled to come out on Monday to take measurements for the counter tops, and I hope to have the island cabinet work completed by Friday.

Sunday, July 3, 2011

Island Living

Today we installed the microwave shelf and assembled the second spice drawer and positioned the island cabinets in their approximate location.  Much work remains to get them secured to the floor, electrical outlets installed and wired, and the back panel installed. Sharron also sewed a very nice wall hanging that we installed to the right of the dining room cabinets.


Island from deck door


Island from dining room

Bird's eye view from dining room


Sharron's wall hanging by the dining room cabinets

Saturday, July 2, 2011

Venting

We started the day with a trip to Home Depot for some one-inch thick wood strips to install under the cabinet above the stove for the ventilation fan, as shown below.


The next task was to cut a hole in the wallboard and the metal duct behind it for the exhaust fan output.  Unfortunately, our jig saw bumped the ducting askew and it took an hour or so to get it re-aligned and securely taped.  Another hour or so was spent preparing the vent hood for mounting.


The GU10 halogen bulbs for the vent were nearly impossible to get into their sockets, so we had to remove the bottom cover to get a better grip on the bulbs and finally get them in.  I flipped on the circuit breaker and all was well.  I like the 4-speed fan and 3-stage light level.

With the vent installed above the stove area, we moved the stove back into position, hooked up the gas, plugged it in to the AC outlet and fired it up.  No gas leaks and all burners working normally - after we purged the air in the line, that is.

Tonight, I re-installed the door frame that we had removed a couple weeks ago when we re-built and straightened the wall next to the door.  The final wall cabinet will be mounted tomorrow morning after I cut holes for the microwave oven AC outlet and the under-cabinet light.  The base cabinet to the left of the stove is now shimmed level and ready to be secured to the wall.  Then, it's time to assemble our island!

Here's the current state of the installation.

Friday, July 1, 2011

Surprise!

Remember that spacer that we forgot to install yesterday?  Well, today our cabinet supplier stopped by and told us that the "spacer" was actually one of the two spice drawers that we purchased.  So, back out came the sink cabinet and spacer.  Because the water pipes for the sink are surface mounted on the wall behind the cabinets, we had to cut out about 1" of spice rack at the back.  This cutting removed the structural support for one side of the spice rack, so we had to fashion a replacement.  All of this consumed several hours, but it's done and in perfect alignment.  I re-installed the spacer between the lazy susan corner cabinet and the stove.

Spice drawer to the left of the sink & spacer re-installed to left of corner cabinet


Spice drawer pulled out

The decorative face plates for the two spice racks are missing and are now on an expedited order.  Not critical items, in any event.
 
This morning we unpacked the new dishwasher and drilled some holes in the side of the sink cabinet for the water lines.  We'll install the dishwasher in a few days, along with the second spice rack.

We have now finished installing all of the wall cabinets, except for the one with the microwave shelf, which we will install tomorrow, along with the exhaust vent above the stove.  I expect these to take all day, if not longer. 

Here's the current state of the kitchen cabinets: